Generate an Item Status report
The Item Status report lets you view information about the items in your resource inventory. Depending on your needs, you can create either a summary or a more detailed version of the report (with or without history).
To generate the report:
|
Note: In Resource Manager, you can only access the resources you have permission to view. |
- Select
 > District Back Officeor Back Office.
 - Select Reports > Resource Reports.
- Under Catalog -- Resources & Items, click Item Status. The report setup page appears.
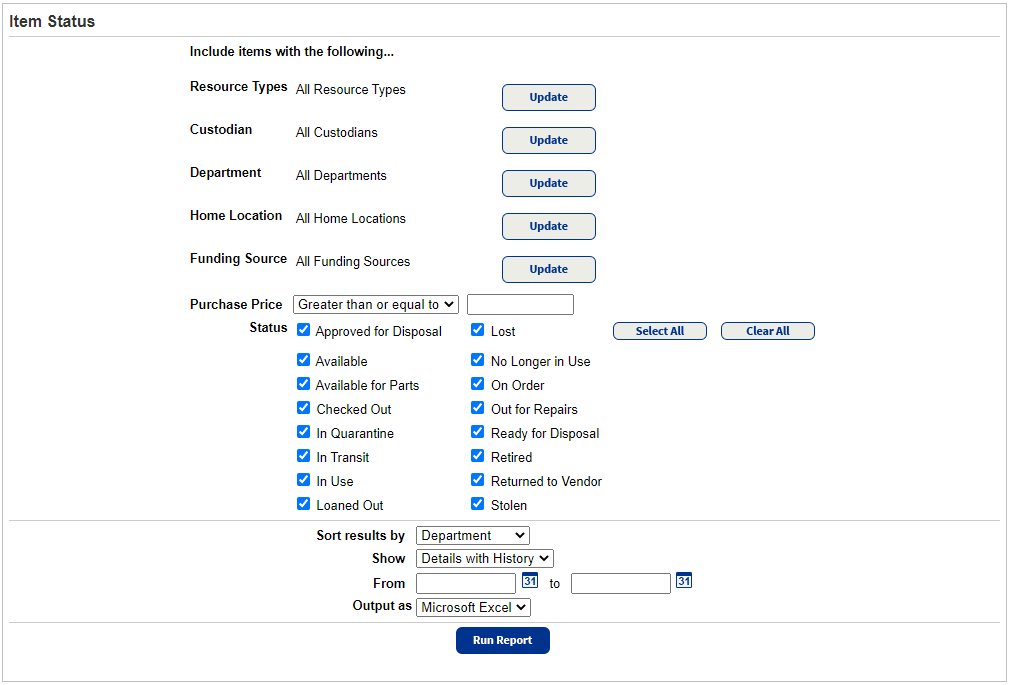
- By default, the report includes all the items in Resource Manager. To limit the report to items that are:
- Resource Types: Of one or more types of resources, click Update.
- Custodian: Assigned to one or more responsible individuals, click Update.
- Department: Assigned to specific departments, click Update.
If you want to include resources that are not assigned to any department, select the Undefined checkbox.
You must select at least one checkbox. - Home Location: Assigned to certain locations, click Update.
If you want to include resources that are not assigned to any home location, make sure to select the Undefined checkbox.
You must select at least one checkbox.Note: Home Location is not available when generating the report for the district. - Funding Source: Associated with certain funding sources, click Update.
If you want to include resources that do not have a funding source, make sure to select the Undefined checkbox.
You must select at least one checkbox. - Purchase Price: Of a specific purchase price, select Greater than or equal to or Less than and enter an amount.
If you select No Purchase Price, the report includes only those items without a purchase price. - Status: Of certain statuses, ensure the checkboxes are selected. To exclude items with certain statuses, deselect those checkboxes.
You must leave at least one checkbox selected.
Note: If you limit your report using more than one criterion, the report includes only items that meet all of the criteria. For example, if you limit the report to include only two Resource Types and one Funding Source, the report includes only items that are one of those resource types and that have been assigned to that funding source. - To organize the information in a way that is most useful for your needs, select an option from the Sort results by drop-down.
- Use the Show drop-down to select whether you want a summary, detailed, or detailed with history report.
Note: To have Details with History appear in the Show drop-down, users need the Access resource history permission. - If you choose Details with History, enter a date range in the From and to fields that appear.
Note: You can limit to one date or a range.
- All dates: Leave both fields blank.
- One date: Enter the same date in both fields.
- Up to and including a specific date: Leave the From field blank, and enter a date in the to field.
- A specific date and all those after it : Enter a date in the From field, and leave the to field blank.
- Use the Output as drop-down to choose PDF or Microsoft Excel format.
- Click Run Report.
- When Report Manager opens, click View to open the summary that includes links to a PDF, XML, and Excel® version of the report.
|
Note: If you open the XML file and then save it, make sure the entire file opens before doing so; otherwise, you may have only a partial XML file. Check the browser's progress bar to verify the XML file is completely open. |
Additional Details
Summary report
The summary report includes the following information:
- Resource Name
- Barcode
- Department
- Status
- Home Location
- Condition
- Custodian
- Checked Out To
The last page contains a list of the options you chose when generating the report.
Details report
The detailed report includes information in the summary, plus the following:
- Date Acquired
- District ID
- Funding Source
- Purchase Order
- Purchase Price
- Serial Number
- All other fields that were defined for each resource type
Details with History
The Details with History report includes information in the detailed report, plus the following:
- Transaction
- Date
- Performed By