Process a transfer request (Resource Manager)
|
Important: Before a site can request a resource transfer, a Destiny Administrator must configure the Resource Manager options for your district. |
After a site creates a transfer request, that request is sent to the district. The district confirms which sites have the resources and forwards the request. Depending on the number of available resources, more than one site might need to fulfill the request. The site or sites then confirm how many resources they will transfer.
 Manage transfer requests at the district
A district user with the Manage Resources for the District permission can process the transfer request.
- Log in as a district user.
- Go to District Back Office.
- Select Catalog > Transfer Resources > Requests tab.
- To work with requests, select from the following options:
- To sort columns in ascending or descending order, click a column header.
- To limit requests, click Customize View, or scroll to the Customize View section at the bottom of the page:
- To View requests needed by a date - after, on, or before - select the option from the drop-down, and then enter a date in the next field.
- To Limit to transfers from a specific site, use the drop-down.
- To choose the type of requests to view, select the checkboxes in the Display section.
- When you are done making selections, click Update.
- In the Open Requests section, find the request you want to view and click
 .
.
Note: The resource type and number requested are listed at the top of the View Request page. In the Available Items section, you can see which sites have the requested resource and how many each site has.
- Find the site you want to transfer resources from; in the Request field, type the number of items you want that site to send.
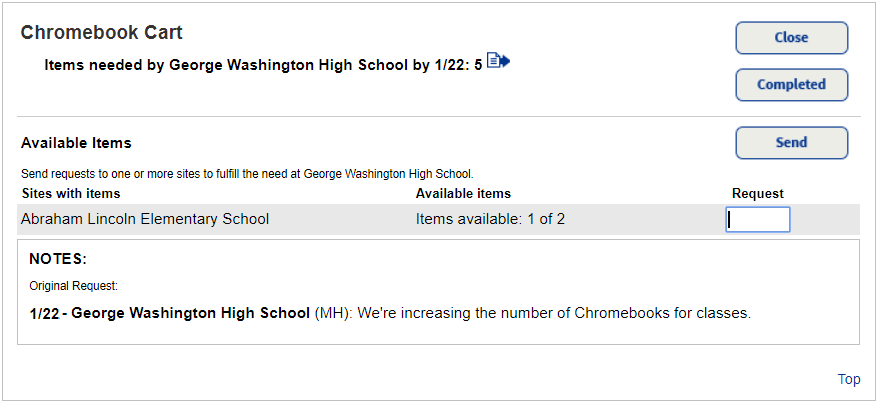
- To send the request to the site with available resources, click Send.
Note: You can send the request to multiple sites and have each site fulfill only part of the request. - Type a note from the district for the school receiving the request, and then click Yes.
- Click Close.
The request moves to the Pending Requests section.
Reply to a transfer request from the district
Once the district directs a transfer request to a site with available resources, the site confirms if it will transfer the requested resources.
- Log in to your site.
- Select Catalog > Transfer Resources > Requests tab.
- In the Incoming Requests from the District section, find the request that requires a reply, and then click .
Note: You can work with requests. To do so, select from the following options:
- To sort columns in ascending or descending order, click a column header.
- To limit requests, click Customize View, or scroll to the Customize View section at the bottom of the page:
- To View requests needed by a date - after, on, or before - select the option from the drop-down, and then enter a date in the next field.
- To choose the type of requests to view, select the checkboxes in the Display section.
- When you are done making selections, click Update.
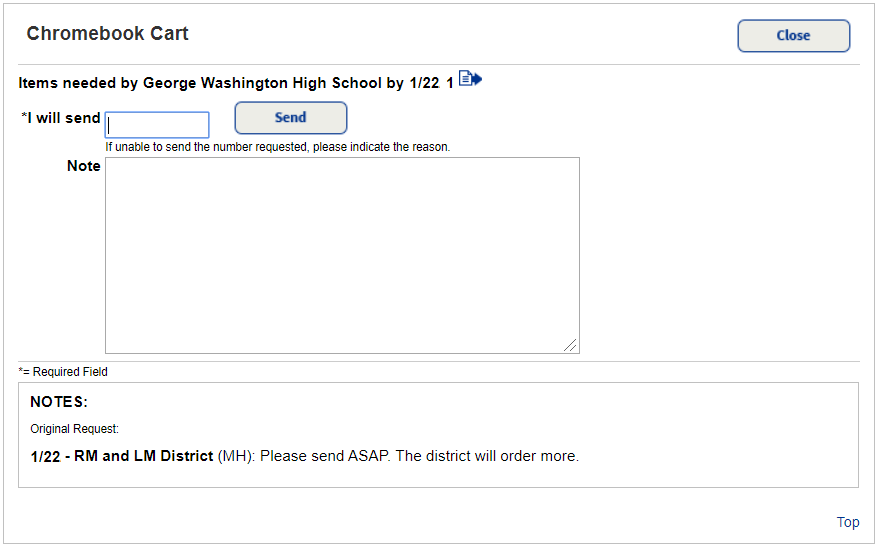
- In the I will send field, type the number of resources to transfer.
- Type a note about the number or condition of resources you are sending.
- Click Send. The message is sent to the district, and you are returned to the Transfer Resources page.
The sending site can upload the resources in Destiny when it is ready to send them to the receiving site. Destiny only transfers items with an Available status.
Delete completed requests
You can individually or bulk-delete completed transfer requests.
To delete completed requests:
- Select Catalog > Transfer Resources > Track tab.
- Choose one of the following:
To... Then... Delete one request Next to the completed request you want to delete, click  .
.Bulk-delete requests
- In the Delete area of Customize View section, at the bottom of the page, select the Complete Requests checkbox.
Note: If you are a site user, select to delete requests sent to or received from the district.
- Click Remove all.
- In the Delete area of Customize View section, at the bottom of the page, select the Complete Requests checkbox.