Print spine and pocket labels
You can print spine and pocket labels when adding a new copy or replacing a damaged barcode. Create them based on copies in a Resource List, copy category, barcode list, barcode range, or when copies were added.
Spine labels contain:
- The call number
- Any volume or issue descriptions and numbers
- Any copy number included in the copy record
Pocket labels contain:
- The call number
- Author
- Title
| Note: Labels print in call number order. If the call number is longer than the label width allows, Destiny breaks the number at the first space, or at a decimal point. For the best labels, make sure to purchase the label stock that accommodates your call number size. |
To print spine or pocket labels:
- Select Reports > Library Reports.
- Under Labels, click Spine/Pocket Labels. The report setup page appears.
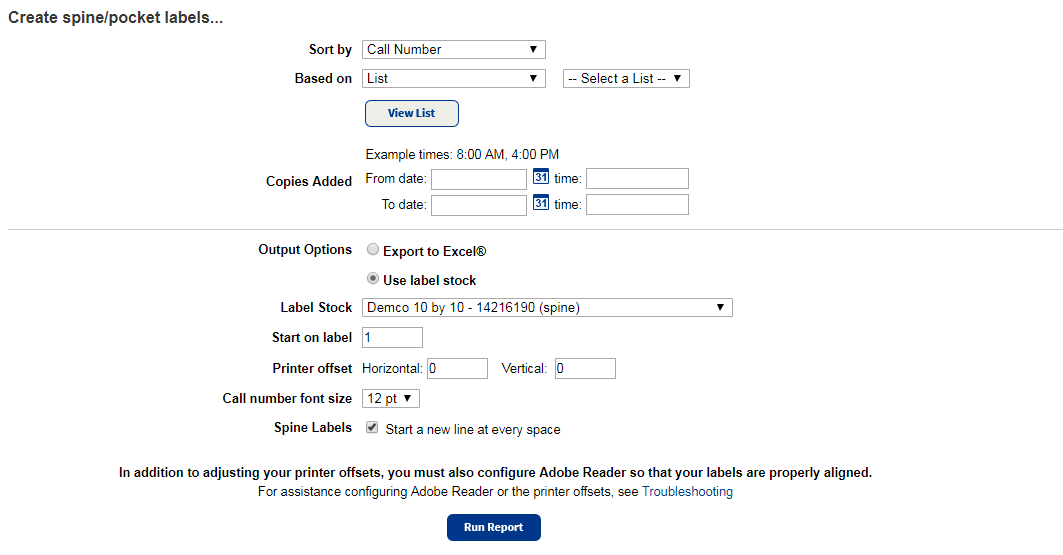
- Use the following table to fill in the fields:
Field Description For
Note: This only appears at the district level. Select either the district or a single site from the drop-down.
Group by
Note: This only appears at the district level. To keep site barcodes together, select the checkbox. Sort by From the drop-down, select either Call Number or Date / Time Copies Added. Based on From the drop-down, select what information will be used to create the report:
- List: Select the appropriate list.
- Copy Category: Select the desired category.
- Barcode List: Scan your barcodes directly into Destiny to create a new list, or choose a previously created list.
Note: You cannot choose Barcode List at the district level.
- Barcode Range: Enter a barcode number range in the defined symbology.
Notes:
- You can limit to one barcode or a range.
- All barcodes: Leave both fields blank.
- One barcode: Enter the same barcode in both fields.
- Up to and including a specific barcode: Leave the From field blank, and enter a barcode in the to field.
- A specific barcode and all those after it: Enter a barcode in the From field, and leave the to field blank.
- Only labels for barcode numbers that are in use are printed; it skips any that are unused.
- You cannot choose Barcode Range at the district level.
- You can limit to one barcode or a range.
Copies Added: Enter beginning and ending dates to have all copies added during that time frame. Adding the time is optional.
Notes:
- Click the calendar icon for a calendar.
- Optionally, enter the time in the following format: <hour>:<minute> (7:00).
- If you chose List or Copy Category, entering a date and time is optional. This lets you further limit the printing. If you leave the date field blank, Destiny ignores the dates copies were added.
- Select the output:
If you want to... Then... Print on labels - Select Use label stock.
-
Use the drop-down to choose one of the preloaded label stocks.
Note: Stock from other vendors may not work as well. Make sure to print a test page on plain paper.
- To continue using partially-used label sheets, enter the number of the next available label in the Start on label field.
- If necessary, set the printer offsets to fine-tune the printing alignment on the barcode labels.
Manipulate the generated report data Select Export to Excel.
- To select the font size, use the Call number font size drop-down.
Note: The larger the font, the larger the spine label.
- If desired, select the Spine Labels Start a new line at every space checkbox.
Note: If you do not select this checkbox, your spine labels will be printed on one horizontal line, instead of one on top of the other.
- Click Run Report.
- When the Report Manager opens, click View. The report opens in a browser.
- Do one of the following:
If you want to... Then... Download the label sheet Click  .
.Print the labels - Position the label stock in your printer.
- Click .
- Set the print settings.
Important: Set to:
- Scale at 100%.
- Print on one side.
- Click Print.